Toronto tearoom Kitten and the Bear specializes in fluffy scones and artisanal preserves – and with their new book, Kitten and the Bear Cookbook: Recipes for Small Batch Preserves, Scones, and Sweets from the Beloved Shop (out on April 2, 2024), owners Sophie Kaftal and Bobby Zielinski share some of their know-how with home cooks. This recipe, for lemon cream marmalade, requires some work – but the ingredients are easy to source and the effort will be well worth it. Kaftal and Zielinski write: “It is tempting to pair lemon with floral, bright, or acidic flavours such as lavender, mint and ginger. However, lemon is delightful made into something sweet and creamy. This marmalade is inspired by some of our favourite citrus cream desserts – think lemon meringue, lemon curd tartlets, buttery lemon shortbread, and citrus creamsicles. The vanilla note is such a contrast to the pithy tang of lemon and zest yet rounds out the flavour for a vintage-y dessert profile. We opt for a high-quality vanilla flavour or vanilla/whipped cream/birthday cake flavoured vodka for this recipe to achieve that pastry-like flavour note. If you prefer a more classic vanilla bean flavour, simply swap the vanilla flavour for pure vanilla extract.”
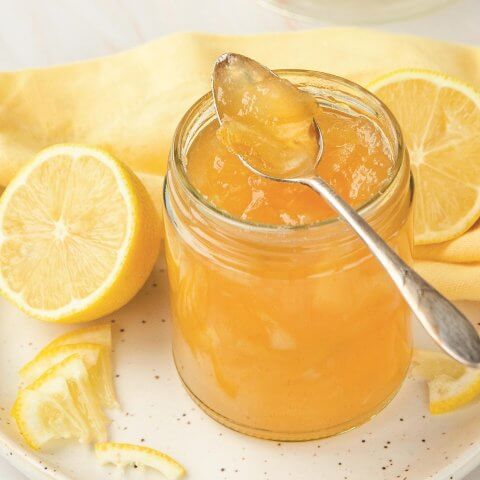
Lemon Cream Marmalade
Ingredients
- 2.05 kg lemons (see note) divided (1.15 kg cut lengthwise into 1-inch-thick wedges, including any seeds and juices; 900 g thinly sliced)
- 3.25 L (13 cups) water divided
- 60 mL (¼ cup) ¼ cup lemon juice
- 1.9 kg (9½ cups) granulated sugar
- 1 tbsp natural vanilla flavouring or extract
Instructions
- Place the 1.15 kg lemon wedges, and any juices or seeds from your cutting board, into a large non-reactive container and cover with 1.75 L (7 cups) of the water. The fruit should bob freely. Cover with a lid and soak at room temperature for at least 12 hours but no more than 24. This begins to soften the zest and removes unwanted bitterness.
- At the same time, place the 900 g lemon slices into a separate large non-reactive container and cover with the remaining 1.5 L (6 cups) water. (These will be the strips of zest in your finished marmalade.) Any reserved seeds, pith and scraps from your cutting board may be added to the container with the lemon wedges for an extra hit of pectin. Cover with a lid and soak at room temperature for at least 12 hours but no more than 24. This begins to soften the zest and removes unwanted bitterness.
- The next day, make the lemon stock by placing a metal mesh strainer over a large bowl or non-reactive container. Set aside.
- Pour the soaked lemon wedges and their soaking liquid into your Dutch oven or stainless steel maslin (see note #2). Bring the mixture to a boil uncovered, over high heat, and then reduce to a simmer. Cover with the lid slightly ajar, and cook for 1 hour, stirring occasionally to ensure the fruit does not stick to the bottom of the pan. The lemons will have started to soften but will still be in intact wedges in the surrounding liquid.
- After 1 hour, remove the lid and continue to simmer over low heat for another 30 minutes, stirring frequently, until the lemons have broken down and the liquid has darkened and has a slightly thickened, syrupy and homogeneous consistency. Dip a spoon or spatula into the stock, remove and allow it to cool slightly and then touch the liquid with your finger. Sufficient pectin has been extracted if the liquid feels viscous and slippery when rubbed between two fingers. If it still feels watery, continue to simmer for another 5 minutes or so, pushing on the fruit with the spatula to encourage it to break down and release its pectin.
- Immediately pour the stock through the prepared strainer. Cover the entire strainer setup with plastic wrap so you don’t lose any volume to evaporation. Allow the stock to thoroughly drip out while you prepare the lemon slices. Wash the pan thoroughly of any lemon residue.
- Pour the soaked lemon slices and their soaking liquid into your Dutch oven or stainless steel maslin. Bring the mixture to a boil, uncovered, over high heat, and then reduce to a simmer. Cover with the lid slightly ajar and cook for 45 minutes, stirring occasionally to ensure no fruit sticks to the bottom of the pot. At this stage, the cooking liquid should have reduced enough so that the lemon slices are no longer floating, and the mixture appears homogeneous. The lemon slices will firm up when the sugar is added, so the goal during this step is to poach them until they are tender enough to bite through easily. Remove a lemon slice with a spoon or spatula, allow to cool, and squish it between two fingers. If it breaks apart easily, the slices are done. If they still feel too firm, simmer for another 5 minutes and test the texture again. Remove from the heat.
- Sterilize your jars and lids (see note #3).
- Unwrap the strainer setup and discard the lemon wedges. Combine the strained lemon stock, lemon slices and fresh lemon juice in your Dutch oven or stainless steel maslin. Pour in the sugar in a slow, steady stream, stirring constantly to avoid clumping. Stir to combine. Bring to a boil over high heat, stirring constantly, until the sugar is dissolved. Once it boils, the mixture may begin to foam minimally. Adjust the heat as needed to keep it as hot as possible without allowing the mixture to overflow or sputter. Continue to cook, stirring constantly and scraping the bottom of the pan to distribute the heat evenly and melt the foam back down into the mixture, about 5 minutes.
- Once the foam subsides, boil over high heat (adjust the heat if the marmalade sputters) for another 10 minutes, stirring frequently, until the marmalade becomes deeper in colour and slightly syrupy and the bubbles are smaller and evenly distributed across the surface. Remove from the heat and skim any foam from the surface.
- Gently stir to evenly distribute the fruit within the syrup, and then test for doneness. The marmalade should pass the wrinkle test or sheet test and reach at least 200°F (100°C) on a candy thermometer. If the marmalade still seems too loose, boil for another 3 to 5 minutes and check the set again. Once set, remove from the heat. Immediately pour in the vanilla and stir vigorously to incorporate.
- Pour the marmalade into the sterilized jars, leaving ¼ inch of headspace, and process by following the instructions in note #4. Arrange the hot jars about 1 inch apart in a cool place, and let sit undisturbed for at least 12 hours.
Notes