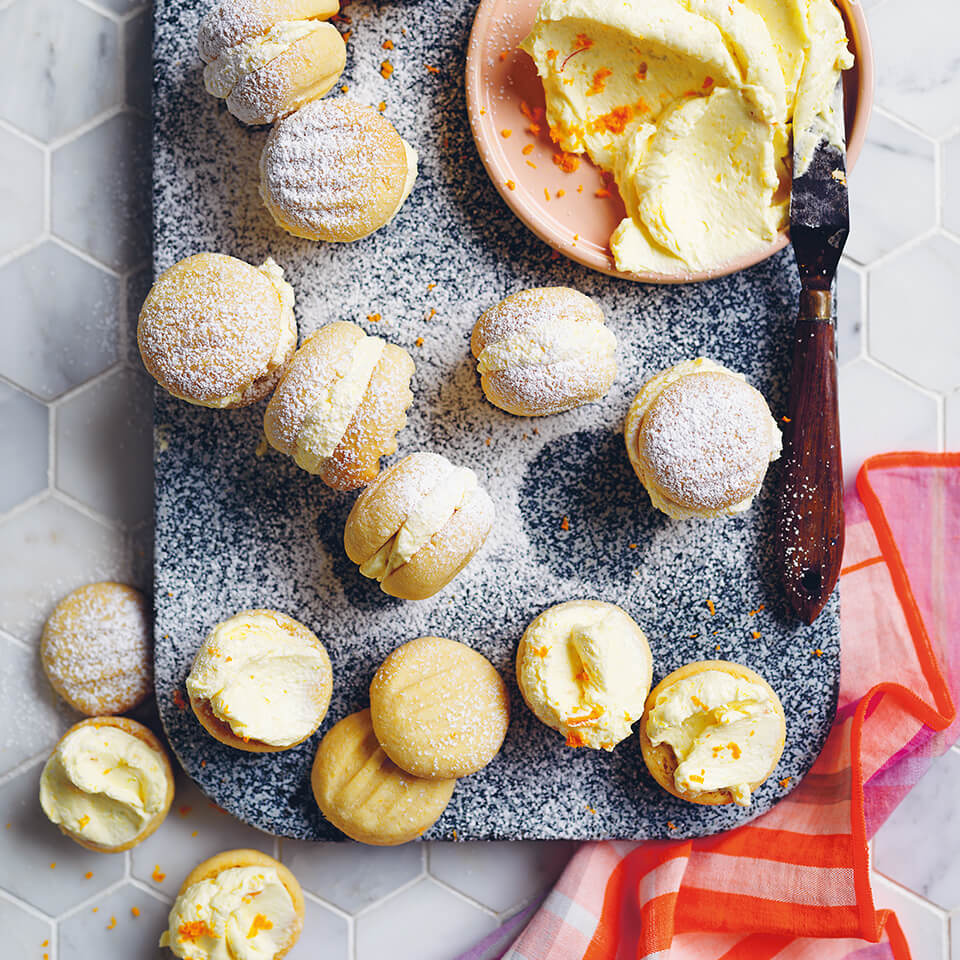
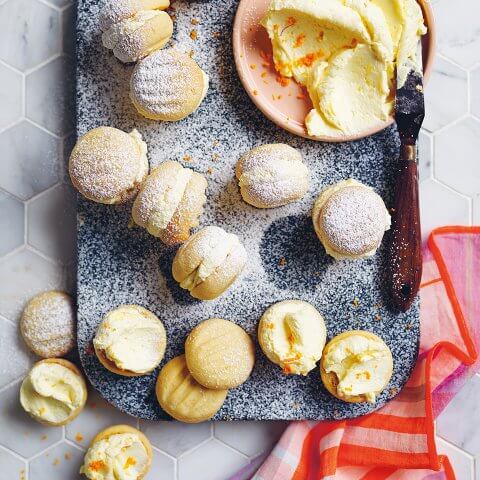
Alice Zavlasky, the Australia-based recipe developer and food writer who recently released Better Cooking, has a totally unique name for these cookies: “Lady Marmalade Melting Moments.” ‘Melting moments’ are shortbread-like sandwich cookies popular in Australia and New Zealand, and the tangy marmalade buttercream in her own recipe reminds Zavlasky of a favourite song. She explains: “You know that version of the song ‘Lady Marmalade’, where Christina Aguilera pumps out that EPIC note as she begins her verse? What a MOMENT, right!? That’s what these melting moments remind me of. The slightly bitter tang of the marmalade in the buttercream is enough to splice through the richness of the biscuit and filling, and as it melts on your tongue, you’ll find yourself having a moment, too. I’ve adopted the custard powder of the classically Aussie yo-yo biscuit, because I like the colour and flavour it provides. Most melting moments recipes use cornstarch – either of these additions stop the flour and fat binding too tightly, which means the biscuit will, quite literally, melt in your mouth.”
Marmalade Sandwich Cookies
Ingredients
- ⅓ cup icing sugar
- 1 cup unsalted butter softened
- 1½ cups all-purpose flour plus extra for dusting
- ½ cup custard powder
- 1 tsp baking powder
- ¼ tsp salt flakes
Marmalade Buttercream
- scant ½ cup scant ½ cup unsalted butter softened
- ⅔ cup confectioners' sugar plus extra for dusting
- zest and juice of ½ orange
- 1 heaped tbsp orange marmalade
Instructions
- Line two light-coloured baking trays, ideally biscuit trays (see note), with parchment paper.
- If your icing sugar is lumpy, pop it into a food processor and blitz, or into a zip-lock bag and mash with a rolling pin.
- Using a stand mixer with the paddle attachment, beat the softened butter until uniformly soft, then add the icing sugar and beat until the mixture is pale and creamy (more is more here).
- Sift together the flour, custard powder and baking powder. Add to the butter mixture, along with the salt, and mix with a wooden spoon until just combined.
- Use a teaspoon measure dusted with a smidge of flour to scoop out 2 level teaspoons of the mixture, rolling into walnut-sized balls between your hands.
- If your hands are hot, pat a little flour onto them to stop the mixture sticking. Evenly space the balls out on the baking trays. Don’t worry if they’re a bit mangy; you can always smooth them out once chilled.
- Pop the trays in the fridge to chill for 15 minutes, or even overnight.
- When ready to bake, preheat the oven to 325°F. Use a floured fork to press each dough ball into a ¾ inch (2 cm) disc. Bake for 15 to 18 minutes, until the biscuits are set enough to be dislodged with a gentle prod, are custard-yellow in colour and the bottom is still blonde. Allow to cool for 10 minutes, then cool completely on a wire rack before filling.
- Make your buttercream in the stand mixer by creaming the butter and icing sugar together until super pale. Add the orange zest, juice and marmalade and beat until incorporated.
- To fill the biscuits, either transfer the buttercream to a piping bag and squeeze it over half the biscuits, or spread a teaspoon of filling over them. Pop the unfilled biscuits on top of the filled ones like hats, squashing ever so slightly to more evenly distribute the filling.
- Give the whole lot one last dusting of icing sugar as a final flourish.
- The biscuits will keep in an airtight container in a cool place for up to 5 days. They can also be frozen (filled or unfilled) for up to 3 months; thaw for at least 30 minutes before serving.
Notes